
We gave Roxy a few presents to commemorate the day - a new leash and reversible bandana.
Roxy is such a wonderful dog. Here she is celebrating on Saturday…

Puppy love at it’s finest!
In celebration of our Roxy girl, I’m sharing how to make a sweet gift set for your favorite pup.
--
Every good pup needs a stylish bandana. Here’s the scoop how to make an over-the-collar style scarf.

To make one, over the collar bandana - I used two 10x9 in scraps of cotton fabric
*Please note, these are the sizes I used for our 15 lb dog. You will need to adjust for larger or smaller breeds.
: How to make an over the collar dog bandana :
Step One: Stack both 10x9” pieces of fabric, fold the pieces in half lengthwise and press. Mark a point along the raw edges at 4.5” from the bottom. Using a ruler, cut at an angle from the 4.5’ mark to the end of the fold to shape the bandana. Unfold and press.


Step Two: With right sides together, stitch around four sides of the fabric, leaving the top side open. Clip your corners, turn right sides out, and press.
Step Three: (Closing the open side) Fold the top of the bandana down 1/4”, press, then fold another 1/4”, press and pin to secure. Now top stitch all around.
Step Four: (To create the casing) Fold the top of the bandana down and pin in place. You want the fold for the casing to be 1/2” larger than your dog’s collar, to ensure it will fit! My dog’s collar is 1” wide, so I folded the fabric down 1 1/2”. Stitch parallel lines 1/4” from the bottom edge. Go over each stitch for durability.

Step Five: Slide your dog’s collar into the casing and snap it around her adorable (and stylish!) neck.

--
I also made her a leash, but didn’t take any pictures while sewing (oops, bad blogger!)
It is a very easy project and if you have any questions, just ask. Here’s the scoop:
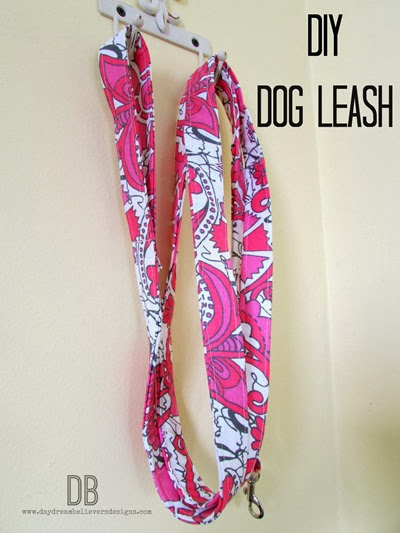
: Supplies :
To make one leash - 7 feet of cotton webbing, 1 yard of cotton fabric, 1 metal swivel clip
: How to make a leash :
Step One: Cut two pieces of fabric that measure 42” x 6” - with right sides together, stitch both pieces of fabric along one short end and press the seam open. (This creates one long, six inch wide piece)
Step Two: Fold the short ends 1/4” over to the wrong side of fabric and press. Next fold the entire piece of fabric in half lengthwise (wrong sides together) and press. Open the leash and press the raw edges toward the crease on the wrong side. Fold in half lengthwise again and press. Insert the cotton webbing into the fold and secure with pins.
Step Three: Using a heavy-duty needle, topstitch around the entire piece.
Step Four: To make the loop for the handle, simply fold one end of the leash down 8” and stitch four lines parallel to the short end - going over the stitching at least twice for extra strength.
Step Five: To attach the hardware, thread the other end of the leash through the hook and overlap it on the leash by at least 1”. Stitch four lines parallel to the short end, going over the stitching for extra strength.
SO easy, right? Just think of all the cute leashes you can make your pup! I’m thinking one for every holiday!
--
As with all Daydream Believers tutorials, I am happy to share them for free, for personal use only.
Please do not sell pieces created with this tutorial for profit.
Please DO use this tutorial and make stylish gifts for your favorite pets or as donations for you local shelter.
Ooh and PLEASE send me photos of your creations so I can swoon over the cuteness!
You can link ‘em up, share on the Facebook page, or #daydreambelieversdesigns on Insta & Twitter.
Tell me: Do you have a pet? Dog lover or Cat person?

No comments:
Post a Comment